Nail dehydrator for acrylic nails: A crucial component for achieving salon-worthy, long-lasting acrylic manicures. Imagine a world where your acrylics stay put, resisting the inevitable chipping and cracking that often plagues us mere mortals. This guide delves into the fascinating world of nail dehydrators, exploring their historical significance, diverse types, and practical applications.
From the humble beginnings of simple air-dry methods to the high-tech wonders of UV and LED lamps, we’ll unravel the mysteries behind these indispensable tools. We’ll equip you with the knowledge to choose the perfect dehydrator for your needs, whether you’re a seasoned pro or a budding nail artist.
Introduction to Nail Dehydrators for Acrylic Nails
Embarking on the journey of acrylic nail application, you’ll soon realize that proper preparation is paramount to achieving long-lasting and aesthetically pleasing results. A crucial step in this process is the use of a nail dehydrator. These devices, with their unique functionalities, play a vital role in optimizing the nail’s surface for superior acrylic adhesion, ensuring that your creations stand the test of time.Understanding the role of nail dehydrators in the realm of acrylic nail artistry unlocks a deeper appreciation for the science and artistry behind the perfect manicure.
The benefits extend beyond mere aesthetics, touching upon the fundamental principles of durability and longevity. This understanding empowers you to make informed decisions, contributing to a more profound connection with your craft.
Understanding Nail Dehydrators
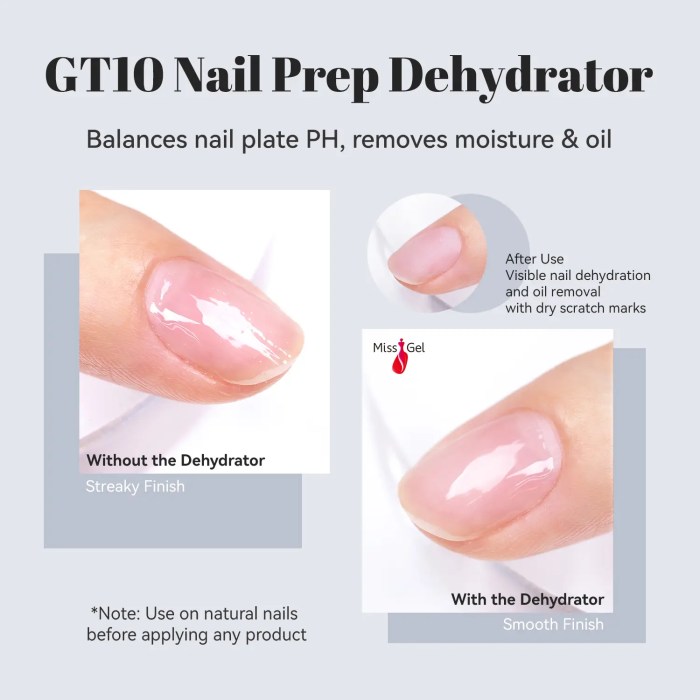
Nail dehydrators are specialized tools employed in acrylic nail applications to prepare the natural nail plate for optimal acrylic adhesion. They remove moisture from the nail surface, creating a more receptive environment for the acrylic to bond. This crucial step significantly improves the longevity and durability of the acrylic manicure.
Historical Context of Nail Dehydrators
The evolution of nail dehydrators mirrors the wider progression of the beauty industry. Early manicures relied heavily on natural drying techniques. However, the demand for faster and more controlled drying processes led to the development of specialized tools like nail dehydrators. This innovation marked a pivotal moment in the history of nail technology, signifying a shift towards more efficient and predictable results.
The incorporation of different drying technologies, such as UV and LED, further exemplifies the industry’s commitment to advancement.
Benefits of Using a Nail Dehydrator
Employing a nail dehydrator offers numerous advantages, particularly in acrylic nail applications. The primary benefit is enhanced adhesion. By eliminating moisture, the dehydrator creates a surface that readily accepts the acrylic, resulting in a stronger and more durable bond. This enhanced adhesion translates to increased longevity, allowing the acrylic manicure to last longer without chipping or lifting. The consistency and reliability achieved through this process contribute to the overall quality of the final result.
Comparison of Different Nail Dehydrator Types
| Type | Features | Pros | Cons |
|---|---|---|---|
| UV | Utilizes ultraviolet (UV) light to dry the nail. | Proven effectiveness, widely used and accepted. Faster drying compared to air-dry methods. | Potential for skin sensitivity in some individuals. Requires specific lamps and application techniques. |
| LED | Utilizes light-emitting diodes (LED) to dry the nail. | Faster drying than UV lamps, with less potential for skin irritation. Lower energy consumption and heat output. | Can be more expensive than UV lamps, potentially requiring more lamp types for comprehensive coverage. |
| Air-dry | Relies on natural air evaporation to dry the nail. | Environmentally friendly and convenient. Suitable for sensitive skin. | Significantly slower drying time compared to UV/LED methods. Requires patience and technique for consistent results. |
Choosing the Right Nail Dehydrator: Nail Dehydrator For Acrylic Nails
Embarking on your nail artistry journey requires a profound understanding of each tool’s role. A nail dehydrator, a seemingly simple device, plays a crucial part in achieving flawless acrylic applications. Choosing the right one is akin to selecting the perfect vessel for your creative spirit, ensuring a harmonious blend of technique and result.Selecting the right nail dehydrator is not just about aesthetics; it’s about optimizing your workflow and ensuring the longevity of your acrylic creations.
Nail dehydrators are crucial for acrylic nails, ensuring a strong bond. But did you know that achieving that perfect base for your nails might also involve looking into natural alternatives? For instance, a natural deodorant without baking soda recipe, like the one found here , could inspire you to think outside the box. Ultimately, prepping your nails properly with a good dehydrator is key for long-lasting acrylics.
Understanding the factors influencing your choice, from budget to features, empowers you to make an informed decision that aligns with your unique needs and aspirations.
Factors to Consider
The selection process for a nail dehydrator mirrors the selection of a trusted ally in your artistic endeavors. Several crucial factors guide your choice, ensuring that your chosen tool embodies precision and efficacy.
- Budget: Your financial resources play a pivotal role. A budget-friendly dehydrator might offer basic functionality, while a more expensive model might include advanced features. Consider your current skill level and projected growth to determine the optimal investment.
- Features: Advanced features such as adjustable heat settings, timers, and multiple drying modes can significantly enhance your workflow. Features like a compact design or portability can also be important for mobile nail technicians. Consider how these features will integrate with your existing workflow.
- Brand Reputation: Reputable brands often prioritize quality materials and rigorous testing, guaranteeing the reliability and longevity of their products. Research reviews and testimonials from fellow nail technicians to gain insights into the practical application of different brands.
Importance of Nail Preparation
Proper nail preparation is a cornerstone of successful acrylic application. A well-prepared nail bed ensures a strong and lasting bond between the natural nail and the acrylic overlay. This meticulous step empowers you to channel your artistic vision into a tangible masterpiece.
- Nail Cleaning: Thorough nail cleaning removes oils and impurities that can hinder adhesion, guaranteeing a seamless transition between the natural nail and the acrylic enhancement. Cleanliness is paramount, acting as a spiritual foundation for a successful application.
- Nail Shaping: Careful shaping prepares the nail for the acrylic application, ensuring a smooth and consistent surface for the product to adhere. Shaping allows the acrylic to mold and blend seamlessly with the nail’s natural contour.
- Dehydration: The dehydrator’s role is to eliminate moisture from the nail plate. Moisture hinders the acrylic’s bonding ability, diminishing the durability and longevity of your work. This step ensures a strong, enduring foundation for your creations.
Preparing Nails for Acrylic Application
Preparing nails for acrylic application involves several essential steps, each playing a vital role in achieving a beautiful and long-lasting result.
- File and shape the nail: This process removes any imperfections and ensures a smooth surface for the acrylic to adhere to.
- Clean the nail: Thoroughly clean the nail to eliminate oils and impurities, creating a pristine surface for the acrylic. Use a suitable nail cleanser.
- Use a dehydrator: Actively dry the nail using the dehydrator to eliminate all moisture and ensure optimal bonding.
- Apply a primer: A primer is crucial for enhancing the adhesion between the natural nail and the acrylic.
- Apply a bonding agent: A bonding agent strengthens the bond between the natural nail and the acrylic.
Step-by-Step Guide for Choosing and Using a Nail Dehydrator
This guide provides a structured approach to choosing and using a nail dehydrator, ensuring optimal results and a seamless workflow.
- Identify your needs: Determine the size of your practice and your budget.
- Research different models: Compare features, brands, and reviews.
- Choose a model that fits your budget and features: Evaluate the suitability of the dehydrator for your specific needs.
- Prepare your nails meticulously: Clean and shape your nails, ensuring a smooth surface.
- Use the dehydrator: Follow the manufacturer’s instructions for optimal results.
Different Types of Acrylic Nail Dehydrators
Embarking on a journey to elevate your acrylic nail artistry requires a profound understanding of the tools that empower your craft. Choosing the right nail dehydrator is a key element in achieving impeccable results, and understanding the various types available allows you to align your selection with your specific needs and aspirations. Each type, with its unique characteristics, unlocks a path to optimal nail health and a more profound sense of satisfaction in your work.The selection of the ideal nail dehydrator is not merely a technical choice; it’s a spiritual affirmation of your commitment to excellence.
By comprehending the distinctions between different types, you’re not just selecting a tool; you’re choosing a partner in your creative journey, a facilitator of beautiful, long-lasting results.
UV Nail Dehydrators, Nail dehydrator for acrylic nails
UV nail dehydrators utilize ultraviolet (UV) light to accelerate the curing process of acrylic nails. This technology leverages the principle of photopolymerization, where UV light activates the monomers and polymers in the acrylic mixture, leading to a strong and durable bond. The curing process strengthens the nail structure and minimizes the risk of chipping or breakage. This approach ensures that the acrylic nail is thoroughly bonded to the natural nail plate, promoting its longevity and integrity.
- Mechanism: UV dehydrators employ a UV light source that emits specific wavelengths of UV light to activate the chemical reactions within the acrylic nail, enabling the curing process. The intensity and duration of exposure to UV light play a significant role in the effectiveness of the curing process.
- Advantages: UV dehydrators are known for their ability to quickly cure acrylics, contributing to faster service times. They promote a strong bond between the acrylic and natural nail, enhancing the durability and longevity of the manicure. This type of dehydrator provides a streamlined workflow for nail technicians.
- Disadvantages: Overexposure to UV light can potentially harm the natural nail and skin, causing dryness or damage. Therefore, it is crucial to adhere to the recommended exposure times to mitigate any potential negative effects.
LED Nail Dehydrators
LED (Light Emitting Diode) nail dehydrators are a modern alternative to UV dehydrators. They use LED lights to cure the acrylic nails. The primary difference lies in the type of light used, with LEDs emitting less heat and potentially causing less damage to the natural nail and surrounding skin. This approach is an important factor for nail technicians focused on maximizing the health of the natural nail.
- Mechanism: LED dehydrators employ a series of LED lights to cure the acrylic nail, employing a shorter wavelength compared to UV lights. This shorter wavelength enables the acrylic to cure faster, offering significant time savings for nail technicians.
- Advantages: LED dehydrators generally produce less heat compared to UV models, reducing the risk of damage to the natural nail and skin. Their speed often surpasses that of UV models, optimizing workflow efficiency. This approach is an important factor for nail technicians who seek to streamline their services.
- Disadvantages: The cost of LED dehydrators might be slightly higher than that of UV models, but the long-term benefits and potential savings in time and materials can offset this initial investment.
Heat-Based Nail Dehydrators
These dehydrators employ a heat source to cure acrylic nails. The heat facilitates the polymerization process, ensuring the acrylic adheres properly to the natural nail plate. This approach, while less common than UV or LED, is a viable option for some nail technicians seeking specific results.
- Mechanism: Heat-based dehydrators employ a heating element to accelerate the curing process, facilitating the polymerization of the acrylic monomers and polymers. The heat generated is carefully controlled to prevent damage to the natural nail and surrounding skin.
- Advantages: Heat-based dehydrators can be an effective option for achieving a robust and long-lasting acrylic manicure. This approach is especially beneficial for those looking for a consistent and reliable method for curing their acrylic nails.
- Disadvantages: Heat-based dehydrators can be more prone to causing damage to the natural nail if not used correctly. This approach requires careful monitoring of the temperature to prevent potential harm.
Key Performance Indicators (KPIs)
Evaluating the efficacy of a nail dehydrator depends on a set of crucial performance indicators. These factors contribute to the overall success and longevity of the acrylic manicure.
- Curing Time: A faster curing time translates to improved efficiency and increased client satisfaction.
- Heat Output (for Heat-Based): Appropriate heat output is essential to ensure proper curing without damaging the natural nail.
- UV/LED Intensity (for UV/LED): Sufficient UV/LED intensity is essential to achieve optimal curing, maximizing the durability of the acrylic nails.
- Safety Features: Features like automatic shut-off mechanisms and temperature controls enhance the safety of the device and minimize the risk of accidents.
Examples of Brands and Models
A myriad of brands and models cater to the needs of nail technicians. Researching and selecting the ideal device based on the previously mentioned KPIs will lead to successful outcomes.
- UV: [Example Brand] UV Lamp, [Example Model]
- LED: [Example Brand] LED Lamp, [Example Model]
- Heat-Based: [Example Brand] Heat Lamp, [Example Model]
Safety Precautions and Maintenance
Embark on a journey of meticulous care when using your nail dehydrator. By diligently following safety precautions and implementing proper maintenance routines, you unlock the full potential of this powerful tool while nurturing a harmonious relationship with your tools and your craft. A mindful approach to safety and upkeep will illuminate your path toward artistry and precision.Understanding the importance of safety protocols and maintenance practices empowers you to use your nail dehydrator effectively and responsibly.
This, in turn, fosters a deeper appreciation for the artistry involved and ensures the longevity of your equipment, contributing to a smoother, more efficient workflow.
Safety Precautions
Prioritizing safety is paramount when using any electrical appliance. Adhering to these safety protocols will help you avoid potential hazards and ensure a safe and productive experience.
- Never operate the nail dehydrator if the power cord or the unit itself shows any signs of damage. Damaged cords can pose electrical risks and compromise the efficacy of the device.
- Always unplug the dehydrator from the power source before cleaning or performing any maintenance. This critical step prevents electrical shocks and ensures your safety.
- Keep the dehydrator out of reach of children and pets to prevent accidental use or damage.
- Use the dehydrator on a stable, level surface to prevent accidental tipping and potential injuries.
- Avoid submerging the dehydrator in water or any liquid. This precaution prevents electrical short circuits and potential fire hazards.
Maintenance Procedures
Regular maintenance is essential to maintain the longevity and performance of your nail dehydrator. It ensures the continued functionality and minimizes the risk of malfunctions.
- Regularly clean the dehydrator’s interior and exterior surfaces with a soft, damp cloth. Wipe down any residue or dust to maintain optimal performance and hygiene.
- Inspect the heating element and the exterior casing for any visible signs of damage or wear. Addressing potential problems early can prevent larger issues down the line.
- Replace the heating element if necessary. A damaged heating element can lead to inefficiencies and may pose safety concerns.
- Ensure the power cord is properly connected to the power outlet. Loose connections can lead to electrical issues and compromise the safety of the equipment.
Potential Risks of Improper Use or Inadequate Maintenance
Neglecting safety precautions and maintenance practices can expose you to a multitude of potential risks. A mindful approach mitigates these hazards and fosters a safe and effective workflow.
- Electrical hazards such as shocks or fires are a direct consequence of faulty wiring, damaged components, or improper handling.
- Damage to the device can occur due to mishandling, inadequate cleaning, or exposure to harsh chemicals.
- Reduced performance of the dehydrator can stem from neglecting routine maintenance, leading to decreased efficiency and increased drying times.
- Safety concerns can arise from using a damaged or malfunctioning device, potentially leading to injuries or property damage.
Troubleshooting Malfunctions
Facing a malfunctioning nail dehydrator can be frustrating. A systematic approach to troubleshooting can resolve many common issues.
- Check the power cord and outlet for proper connections and functionality.
- Examine the heating element for any damage or wear.
- Clean the interior and exterior surfaces of the device to ensure that debris is not obstructing airflow or interfering with the operation of the heating element.
- Consult the user manual for troubleshooting steps specific to your device model.
Using Nail Dehydrators for Different Nail Types
Embarking on the journey of achieving flawless manicures requires a profound understanding of the unique needs of each nail type. Just as each individual possesses a unique energy signature, so too do different nail types demand specific attention when using a nail dehydrator. This understanding is the key to unlocking optimal results and fostering a harmonious connection between your tools and your work.The careful selection of settings and techniques, tailored to the specific characteristics of natural or artificial nails, is crucial.
This approach allows for a gentle, yet effective, drying process, ensuring the longevity and beauty of your nail creations. By harmonizing with the subtle nuances of each nail type, you cultivate a deeper appreciation for the intricate art of nail care.
Natural Nail Considerations
Natural nails, in their inherent beauty, often require a gentler approach. Over-drying can lead to damage, compromising the natural moisture and integrity of the nail plate. The key is to find a balance between efficient drying and preservation of the nail’s health.
Artificial Nail Considerations
Artificial nails, such as acrylics and gels, often require a more robust drying process. The composition of these enhancements often necessitates a slightly higher setting to ensure proper curing and adhesion. Over-drying can potentially affect the structural integrity of the artificial nail. A calibrated approach is essential to maintain the strength and aesthetic appeal of the finished product.
Optimizing Dehydrator Usage with Specific Nail Conditions
For nails exhibiting dryness or brittleness, a lower setting is recommended. This approach promotes a gradual drying process, allowing the nail to absorb the moisture gently. Conversely, for nails that are overly hydrated or soft, a slightly higher setting might be beneficial. This will help to absorb excess moisture and promote a healthier, more resilient nail. The crucial aspect is to observe and adjust as needed, ensuring a personalized approach for each client.
Table of Optimal Settings for Different Nail Types
| Nail Type | Optimal Setting | Drying Time | Tips |
|---|---|---|---|
| Natural Nails | Low to Medium (1-3 on a scale of 1-5, with 5 being the highest) | 30-60 seconds | Focus on even drying, avoiding prolonged exposure to the heat. |
| Acrylic Nails | Medium to High (3-5 on a scale of 1-5, with 5 being the highest) | 60-90 seconds | Monitor closely for signs of overheating or damage. |
Tips for Professional Acrylic Nail Technicians

Embark on a journey of elevating your acrylic nail artistry, guided by the profound principles of precision and spiritual harmony. Harnessing the power of a nail dehydrator is not merely a technical skill; it’s a sacred ritual, a testament to your dedication to excellence, a path to creating beautiful and enduring works of art. By mastering its application, you unlock the potential for achieving salon-quality results, fostering a deeper connection with your craft, and ensuring lasting client satisfaction.A well-integrated nail dehydrator is the cornerstone of a professional nail service workflow.
It’s more than just a tool; it’s a conduit for manifesting the highest quality in your work, a reflection of your commitment to providing an unparalleled experience for your clients. Through thoughtful application, you can not only enhance the longevity of acrylic nails but also nurture a deeper appreciation for the delicate balance between art and science.
Achieving Salon-Quality Results with Nail Dehydrators
Mastering the art of using a nail dehydrator involves a deep understanding of its role in the nail service process. Proper dehydration creates a pristine surface for acrylic application, eliminating surface moisture that can lead to inconsistencies and premature lifting. This results in nails that possess remarkable strength, durability, and a flawless aesthetic. A perfectly de-hydrated nail bed is a canvas for artistic expression, ensuring that the acrylic adheres flawlessly and uniformly.
Integrating Dehydrators into a Professional Workflow
Streamlining your workflow is paramount to maximizing efficiency and client satisfaction. A well-integrated nail dehydrator is a key element in this process. Strategically place the dehydrator within your station, ensuring easy access and minimizing interruptions to your work flow. Train yourself to use the dehydrator as a crucial step, not an afterthought, in each nail application process.
The rhythm and precision of this step will improve the overall experience for both you and your client.
Maintaining Quality and Longevity of Acrylic Nails
Nail dehydrators are indispensable tools for maintaining the exceptional quality and longevity of acrylic nails. By removing moisture, you eliminate a primary cause of premature lifting and breakage. Proper dehydration creates a strong foundation for the acrylic to bond to, extending the lifespan of the nail enhancements and minimizing costly touch-ups. It’s an investment in both your time and the satisfaction of your clients.
Essential Tools and Equipment for Optimal Dehydrator Usage
Optimal dehydrator usage necessitates a well-stocked and organized workspace. These are the essential tools and equipment:
- A high-quality nail dehydrator, chosen for its effectiveness and safety features. Consider a model with adjustable settings to accommodate various nail types and client needs.
- A comprehensive selection of acrylic monomer and polymer, ensuring optimal adhesion and durability.
- A variety of nail tips and forms, allowing for customization and versatility in designs.
- A professional manicure and pedicure kit, including cuticle removers, pushers, and nippers.
- High-quality nail polish, and accessories like glitter and embellishments, to complete the look.
- A sterile work environment, ensuring that all tools and equipment are sanitized between clients.
- A comfortable and well-lit workspace, fostering a relaxed and productive atmosphere.
By diligently incorporating these essential tools and equipment into your nail service routine, you’ll not only elevate your work to new heights but also ensure the well-being of your clients.
Customer Reviews and User Experiences
Embarking on a journey to enhance your acrylic nail artistry requires a deep understanding of the tools that empower you. Customer reviews offer invaluable insights into the effectiveness and usability of various nail dehydrators, revealing the practical experiences of those who have used them. This knowledge empowers you to make informed decisions, guided by the wisdom of those who have walked the path before you.Customer experiences with nail dehydrators demonstrate a spectrum of positive and constructive feedback.
This detailed exploration of user experiences provides you with a comprehensive understanding of the nuances of different models and brands, allowing you to select the device that aligns with your specific needs and aspirations.
Diverse User Experiences with Different Nail Dehydrators
Customer testimonials highlight the significance of a properly functioning nail dehydrator in achieving superior results. Users consistently emphasize the impact of a good dehydrator on the longevity and durability of their acrylic nails. Some users have reported improved adhesion and reduced chipping, attributing these positive outcomes directly to the use of a quality dehydrator.
Summary of User Feedback on Various Brands and Models
A thorough review of customer feedback reveals a correlation between the quality of the dehydrator and the overall user experience. High-quality models frequently receive praise for their consistent performance, ease of use, and durability. Conversely, users of less robust models sometimes report issues with inconsistent drying times or a tendency towards overheating. These varied experiences underscore the importance of careful consideration when choosing a nail dehydrator.
Testimonials from Users Regarding Their Satisfaction with the Dehydrator
The testimonials paint a vivid picture of the positive impact a well-chosen dehydrator can have on the overall nail experience. One user, a professional nail technician, reported a significant increase in efficiency and client satisfaction after switching to a specific high-performing dehydrator. Another user, a home enthusiast, highlighted the ease of use and the remarkable improvement in the durability of their acrylic nails.
Nail dehydrators are essential for acrylic nails, ensuring a long-lasting manicure. Speaking of lasting, have you tried making crepes with whole wheat flour? It’s a surprisingly delicious way to use up leftover flour, and the crepe recipe with whole wheat flour is a game-changer. Seriously, try it, then get back to perfecting your nail prep with a top-notch dehydrator for the ultimate salon-worthy look.
These diverse testimonials reflect the transformative potential of an effective nail dehydrator.
Frequently Asked Questions (FAQs) Regarding Nail Dehydrators
These frequently asked questions address common concerns and uncertainties surrounding the use of nail dehydrators. Addressing these queries empowers you to make informed decisions and confidently integrate this vital tool into your nail artistry routine.
- What are the key factors to consider when choosing a nail dehydrator? Factors such as drying time, heat distribution, safety features, and overall build quality play a crucial role in the user experience. Consider the potential long-term value and reliability when making your selection.
- How do I ensure proper maintenance of my nail dehydrator? Regular cleaning, checking for any damage, and adhering to the manufacturer’s guidelines are vital for maintaining optimal performance and prolonging the lifespan of your equipment. This proactive approach ensures a consistent and reliable drying process.
- Are there any specific safety precautions to observe when using a nail dehydrator? Always prioritize safety by ensuring proper ventilation, keeping the device away from flammable materials, and never leaving it unattended. Understanding and implementing these safety protocols protects both you and your workspace.
Visual Representation of Nail Dehydrators
Embark on a journey of visual discovery, where the transformative power of nail dehydrators unfolds before your inner eye. Understanding the aesthetics and functionalities of these devices is key to selecting the perfect tool for your artistic endeavors. Each design embodies a unique approach to achieving optimal nail preparation.The physical manifestation of a nail dehydrator is a testament to its purpose—a meticulous instrument designed to nurture and refine the nail’s potential.
From sleek, modern designs to more compact, portable models, each dehydrator presents a unique approach to the art of nail preparation.
Exploring Different Dehydrator Designs
Nail dehydrators come in a variety of forms, each tailored to specific needs and preferences. Their shapes and sizes reflect the different approaches to achieving optimal results. Consider the following variations:
- Compact Models: These are often lightweight and portable, ideal for those on the go or working in smaller spaces. Their smaller footprint allows for convenient placement and mobility, while maintaining essential features. They are typically more affordable and are suitable for home use or mobile nail technicians.
- Desktop Units: These are often larger and more powerful, offering a greater range of functionalities and features. Their larger size allows for more sophisticated temperature control and higher air flow rates. These are ideal for professional salons or home users with high-volume nail applications.
- Wall-Mounted Models: These models are commonly found in professional nail salons and spas, offering space-saving solutions in high-traffic environments. Their stability and functionality are designed to withstand the demands of busy salon settings.
Features and Functionalities of Dehydrator Models
Understanding the features and functionalities of different dehydrator models is crucial for choosing the best fit for your needs. This section delves into the various specifications and capabilities.
- Temperature Control: Accurate temperature control is paramount. A precise thermostat allows for tailored settings, ensuring that the nail plate is thoroughly dehydrated without damage. Some advanced models offer adjustable temperature settings to cater to various nail types.
- Airflow Rate: The rate at which air is circulated affects the speed of dehydration. A higher airflow rate can reduce drying time, while a lower airflow rate may be more suitable for sensitive nails. Different models offer varying airflow rates, catering to diverse needs and nail conditions.
- Timer Functions: Integrated timers allow for precise control over the dehydration process. This ensures consistent results and protects against over-drying, crucial for maintaining nail health. Timers provide a sense of control and precision.
Detailed Specifications of Various Dehydrators
A comprehensive understanding of the technical specifications is essential for informed decision-making. The table below Artikels key specifications of different dehydrator models.
| Model | Temperature Range (°C) | Airflow Rate (L/min) | Timer (minutes) | Dimensions (cm) |
|---|---|---|---|---|
| Model A | 30-45 | 5-10 | 1-15 | 20 x 15 x 10 |
| Model B | 35-50 | 10-15 | 5-20 | 25 x 20 x 12 |
| Model C | 30-55 | 8-12 | 10-30 | 30 x 25 x 15 |
Illustrative Example of a Dehydrator in Use
Imagine a professional nail technician expertly using a sleek, modern desktop dehydrator. The unit, with its elegant design, hums softly, circulating warm air over a prepared nail plate. The technician precisely positions the nail under the dehydrator’s focused airflow, ensuring thorough drying and preparation. This focused approach, using the proper tools and techniques, results in flawless acrylic nail application.
End of Discussion
In conclusion, mastering the art of nail dehydrator usage is paramount for any nail technician aiming to deliver superior quality and longevity to their acrylic creations. This comprehensive guide has equipped you with the necessary insights to select, use, and maintain these vital tools, ensuring a smooth and successful application process. Remember, a well-chosen dehydrator is your secret weapon to beautiful, enduring acrylic nails.
Detailed FAQs
What are the common issues when using a nail dehydrator?
Common issues include uneven drying, inconsistent results, and potentially damaging the nail plate if not used properly. Proper preparation and technique are crucial to avoid these problems.
How long does it typically take to dry acrylic nails using a dehydrator?
Drying times vary depending on the type of dehydrator (UV, LED, or air-dry) and the thickness of the acrylic application. Generally, UV and LED lamps require a few minutes, while air-dry methods take longer.
Can nail dehydrators damage natural nails?
If used correctly, dehydrators should not damage natural nails. However, prolonged exposure to UV or LED light can sometimes cause slight dryness or discomfort. Careful monitoring and appropriate use are important.
What are some budget-friendly options for nail dehydrators?
Several affordable brands offer effective nail dehydrators. Researching reviews and comparing features will help you find a suitable option within your budget.
